


Charmingly chaotic collage
A four-step tutorial to put your own spin on this cutting art form

I’ve been devouring Sanda Anderlon’s work over on Pinterest. It was my gateway into her fantastical world of photo collage, some pieces of which she animates to give them even more dimension.

I thought this admiration/obsession of mine would be a fun opportunity to share a funshop (a.k.a. tutorial), including some of my favorite tips and resources. Outside of illustration, collage is the art form I turn to most often. I love how it accesses a different part of your brain than drawing or painting does. It’s like putting an easy breezy puzzle together via art.
INSPO DUMP
First, here are works from some other photo collage artists to show you how different approaches can be taken in the same medium:
✧ Tomi Ungerer

✧ Hermés

✧ Jared Olivas

✧ Constantin Prozorov

✧ Morgan Lindsay Nelson

Does the idea of a paid subscription make your wallet as commitment-phobic as Joey Tribbiani? Then you can tip me via Buy Me a Coffee. It goes a long way to help this neurodivergent, creative girlie get her basic needs met!
LE TUTORIAL
1. Gather materials
For collage, graphics, photos, and/or illustrations are like your paint and pencils. They are what you’ll swirl (or arrange, rather) across the page.
There are a two best-practices to find materials to work with. And you aren’t limited to just one. When you combine them, you get something even more original and you.
Found illustrations/photography
Your own illustrations/photography
A NOTE ON COPYRIGHT
When using source material that isn’t from the above list of free to use images or that isn’t your own work, it’s a good rule of thumb to pay attention to fair use guidelines. This isn’t legal advice. However, when creating collages from copyrighted materials (such as current or old ads, books, and/or magazines), the following is helpful information to keep in mind to help you assess/mitigate risk.

This comes from The Graphic Artists Guild:
The copyright statute sets forth four factors for courts to consider in determining whether a particular unauthorized use qualifies as fair use:
The purpose and character of the use, including whether you’ve made a new transformative work, and whether your use is commercial.
The nature of the original work, such as whether it is more factual than fictional.
How much of the original work was used.
Whether the new use affects the potential market for the original work.
Even more is expanded on in their Q&A article, Fair Use or Infringement?
Collage is a time honored art form that utilizes pre-existing materials, including artwork and photographs. Often the materials will be copyrighted. So your unauthorized use of those materials would be copyright infringement unless your collage qualifies as fair use. Unfortunately, there is no legal rule on whether collage as a category would be fair use. It will depend in each case on an evaluation of the four fair use factors with respect to the particular collage.
For most collages, Factor (1), purpose and character of the use, will be the key factor. Typical collages, those that use many different materials juxtaposed in ways that create new visuals and meanings, will be considered transformative works. A work is “transformative” when the copyrighted material is “transformed in the creation of new information, new aesthetics, new insights and understanding.” In contrast, a work is not transformative if it merely uses the copyrighted material in the same way or with the same effect as the original work.
Overall, if you want to most creative freedom without worry, keep to the above list of found and/or your own materials to play it safe.
2. Digital approaches
The focus here is on digital tips, since traditional paper + glue collage is fairly self-explanatory. Definitely go the analogue route if it feels more fun to you!
Personally, I prefer digital because not only is it mess-free but endlessly editable. Meaning: variety galore!
TIP: To digitize any physical art for this project, I recommend using a scanner or this handy smartphone app: PhotoScan.


Following are the nitty gritty next steps and app options.
ADOBE EXPRESS (free + basic)
Cutting out images:
There are many other online tools and apps similar to this that you can find via a quick Google search. Their background removal option is the fastest way to isolate just the foreground of an image. Note: this automated method may end up incorrectly isolating the image if there’s a low contrast and/or complicated background. It’s best for simple images with clean lines.
Canvas/document:
They offer a variety of aspect ratios for any application you may desire: Instagram stories, zine, slideshow, etc. While there currently isn’t an option to set DPI (dots per inch) or PPI (pixels per inch) when choosing your document size, you can achieve a print quality of 300 DPI when you export to a PDF. Otherwise, web quality is available for other export options.
PHOTOSHOP (paid + pro)
Cutting out images:
This is my favorite option for having the tools to both automatically and manually cut out images. The magnetic or polygonal lasso tools are perfect for replicating traditional scissors. The pen tool is great for getting perfect curves and angles.
Canvas/document:
Even if you plan to only display your collage on social media, I recommend sizing your document at 300 DPI so that you can make prints of it down the road. This print quality, original document size can easily be exported for the web at 72 DPI. You can always make it smaller, but you’re likely to lose image quality if you ever want to enlarge it.
PINTEREST (free + android/iOS only)
While I personally haven’t used this method, I’m fascinated by the collages I’ve seen that utilize this feature. Here is a detailed breakdown of how to get started (note that it’s currently only available via the Pinterest app.)
3. Develop the subject + your unique POV
This is an equation I turn to help refine my individual style (adapted from the aggressively funny and talented Ethan Becker.)
NOTE: this also can be tweaked and applied to writing and other forms of creativity!
Line/shape + Genre + Story + Design = your style
To break it down:
LINE/SHAPE examples
Rough/torn edges
Graphic blocks
Detailed, exact cut-outs
Overlapping or side-by-side elements
GENRE examples
Romantic
Fashion
Horror
Gothic
STORY (a.k.a. theme and emotion) examples
Playful, contemplative, or tense
Human and/or animal
Mystical or realistic
Use an inspiration source as a prompt like Sanda did for her collage (above), “a bit of poetry and visuals inspired by Stevie Nicks and Fleetwood Mac.”
DESIGN examples
Colors
Textures
Patterns
Negative/positive space
✧ Secret sauce: combine two items from each category for a unique blend of style.
4. Composition tips
The way you compose your collage is just as important as the style. How you scale it, juxtapose elements, and what you include or don’t include all matters.
This is where you can relax into unlearning how you think things should look. It’s your vision. Remember to embrace your instincts over anything else.
BIG, MEDIUM, SMALL
If you’re looking for an easy guideline to bring some balance to your collages, this is it. You’ll find this in cinematography, photography, etc. It doesn’t always show up the same way twice but you can see how each interpretation brings a more harmonious quality to the piece.
The simplest way to show you is by marking up existing work. I’ll use the following colors to represent the sizes.
Blue = big. Red = medium. Green = small.


EMBRACE THE UNEXPECTED
The visual world you’re creating is completely at your whim. Don’t limit youself by feeling like you have to replicate what already exists. Collage is the best way to show the familiar through a new perspective. It gives you the ability to comment on the status quo by juxtaposing elements that tell a fresh story.
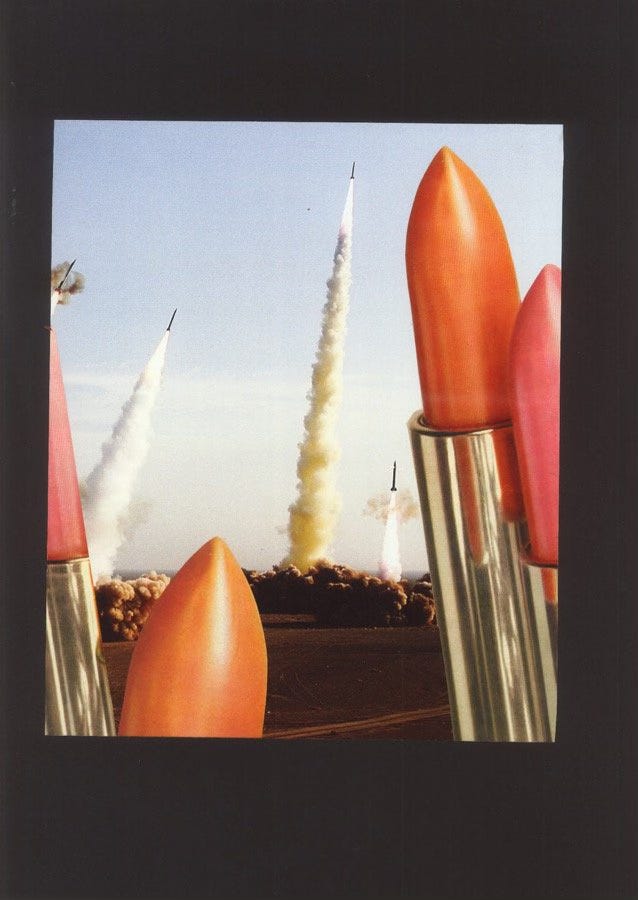
Tomi Ungerer, who’s website tagline is “expect the unexpected”, did this really well. In the collage below, he juxtaposed lipsticks amongst rockets to comment on the contrast of beautification and exploration, or depending how you look at it: destruction.
FRANKENSTEIN’S MONSTER IT
Don’t be afraid to think like Dr. Frankenstein, “stitching” together even the smallest features on a face or in an interior space.
Sanda Anderlon is a great example of doing this. Zoom in on her pieces to see how varied her sources are, even for a single figure or room.
Bonus: other ways to utilize collage
Junk journal
Vision board
Mood board
Wish list
Communicating ideas to clients
Drawing references
Blog/Substack feature images
Zines
Posters or prints
Digital wallpaper or lock screen backgrounds
Design proof of concept (like Natalie shares in the note below.)

Most importantly: have fun! Try not to judge what you put on the page, instead focus on being curious and adapt an explorative mindset.
If you want any feedback or have questions, be sure to comment or join on the convo in the chat hotline (available for paid subs).
Happy collaging,

If you’re enjoying this content, consider upgrading. Whether a free or paid subscription, it all helps support me and my work (plus you get extra perks behind the velvet sub ropes!)